Corsair Cove Skull Rock Island & Plunderer's Pier
Vertical building on the demo's skull-shaped home.
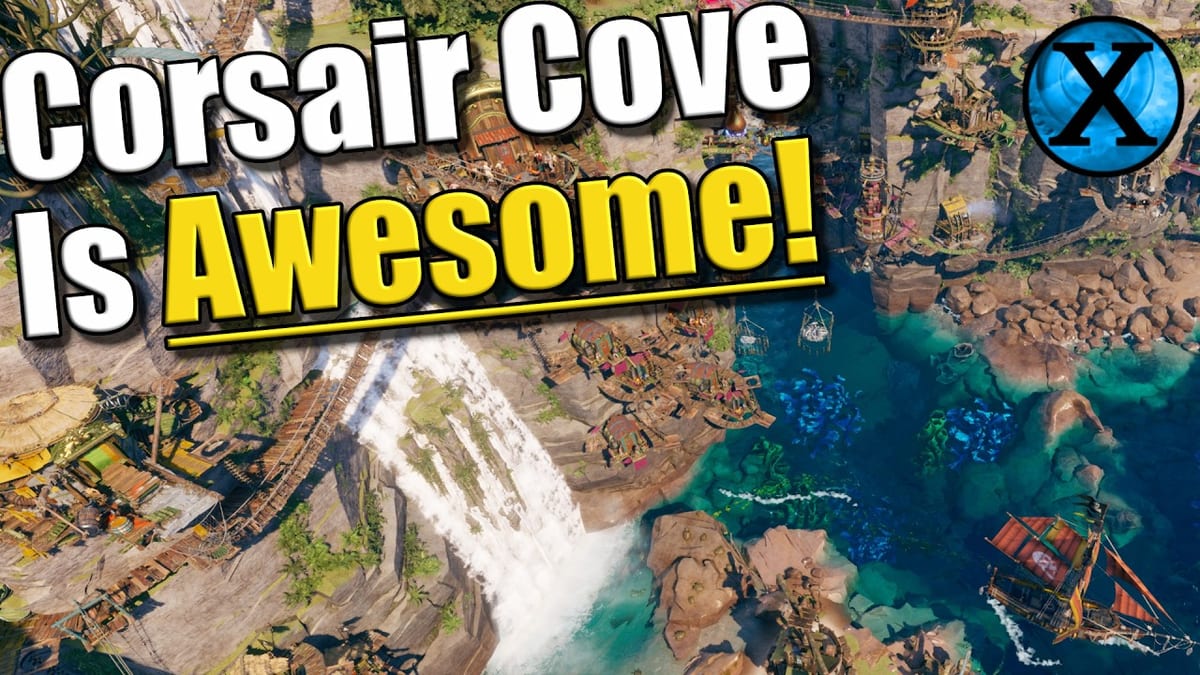
The Corsair Cove demo drops your escaped crew on an uninhabited island shaped unmistakably like a pirate skull — tall cliffs, waterfall greenery, rough surrounding seas, and shipwrecks that warn newcomers the waters bite. Hooded Horse’s Skull Rock trailer highlighted the same landmass: paradise aesthetics hiding sharks, Crown patrols, and treacherous approaches. For colony players, the island is a three-dimensional blueprint where every ledge is real estate and every chasm demands a bridge.
This guide maps the demo island’s functional zones, not a pixel-perfect coordinate chart. Use it alongside the demo story intro for objectives and raw materials for deposit types.
Island overview
Visual identity. A giant skull motif dominates the skyline — eye sockets become building alcoves, the jawline forms lower beaches, and upper cranium ridges host long-range gun towers. Waterfalls and tropical foliage sell the fantasy, but gameplay treats the terrain as a logistics grid tilted ninety degrees.
Story name. Your primary camp becomes Plunderer’s Pier once constructed from shipwreck planks. Satellite camps you found later receive custom names, but the demo narrative consistently refers to the starter hub by this title.
Naval context. The island sits inside a larger archipelago. Skull Rock also labels the first sea waypoint adjacent to your cove — confusing in text, but in-game UI distinguishes home island from the nearby patrol node sharing the name theme.
Starting zone: shipwreck and main pier
You spawn with:
- A shipwreck holding sixty-five planks in storage.
- A partially built pirate camp (Plunderer’s Pier foundation).
- Thirty crew (twenty-eight drifters, two named pirates early on).
- No pier, no food chain, no defenses.
First paths run from shipwreck to camp along the lower skull jaw. Do not relocate the shipwreck; drain it via drifters until empty. This zone remains your primary plank buffer until sawmills saturate warehouses.
Cliff building bands
Corsair Cove classifies buildable space into elevation bands:
Lower beaches and shallows. Pier anchors snap here. Fishing huts may also qualify if within camp range. Amara’s flagship approaches these waters during scripted attacks — gun towers later cover the same sight lines.
Mid-cliffs. Ideal for sawmills, warehouses, campfires, galleys, moonshine stills, and taverns. The demo encourages stacking industry on overhangs connected by wooden ramps described humorously as OSHA nightmares in community videos. Mid-cliffs balance drifter distance between wood lines above and pier below.
Upper ridges. Housing tents, quarries, stone cutters, and gun towers. Height advantage matters for tower range over pier chokepoints. Upper camps also sit near additional pirate camp slots unlocked after repelling Amara with a completed tower and ship.
Building on cliff faces is not cosmetic — flat ground is scarce. The game snaps structures to ledges; invalid slopes reject placement until you rotate the camera.
Resource deposits on the demo island
| Deposit | Typical location | Building |
|---|---|---|
| Hardwood trees | Fertile patches mid-island | Woodcutter |
| Cassava fields | Fertile soil away from camp | Cassava picker |
| Stone | Quarry markers on ridges | Quarry + stone cutter |
| Fish | Coastal shallows | Fishing hut |
| Salt / guano | Remote beaches post-expansion | Specialized gatherers |
| Freshwater / iron | Off main cove, second camp range | Satellite camp |
Scouting reveals icons only after progression flags — finishing Plunderer’s Pier and surviving Amara unlocks more map pings on the island strategic overlay.
Pier slots and shallows
The first shallow pier tutorial-snaps to specific rocks below Plunderer’s Pier. Connect with paths or bridges before assigning construction drifters.
Second pier slots unlock on distant beaches, often near iron ore or freshwater. These enable two-ship strategies with separate loot piles and repair queues. Founding a satellite camp near a second pier prevents drifters from hiking entire island widths for every plank.
You cannot build arbitrary floating platforms — water placement is pier-only.
Defensive layout
After Skull Rock tutorials, quarry stone enables gun towers. Place towers covering pier approaches and Amara’s sailing vector into the cove. Towers consume black powder converted to ammunition when supplied — a decorative tower without powder logistics fails silently during raids.
Amara’s rematch plays as hybrid story and defense check. Players with fed towers and repaired ships fare better than colonies still repairing tavern damage from her first visit.
Community events and landmarks
Story events trigger on the island itself — hidden soldiers among crew, celebration pigs spinning near taverns, debris washing ashore with exhausted pirates from Crown fights. These are not separate map zones but timed overlays on your home space.
Optional deeds reward island milestones: housing counts, warehouse totals, entertaining structures, walk-the-plank sawmill buffs. Track them in the ideological compass UI while expanding across skull ridges.
Expansion beyond one mega-base
Camp range circles prevent one Plunderer’s Pier from harvesting entire island resources. The demo pushes second pirate camps on far ledges — close enough to share ideology buffs, far enough to require deliberate bridge networks. Trying to stretch one camp’s radius with endless paths works early but collapses once guano and iron demand satellite industry.
Transition to world map
Zoom out from the island to enter seamless world map mode detailed in world map overview. Home island management pauses visually but not economically — stew consumption continues while you watch ships sail to Skull Rock.
Building checklist by island zone
- Jaw beach: Complete Plunderer’s Pier path, first pier, loot piles.
- Mid skull face: Woodcutter, sawmill, warehouse, galley row.
- Upper skull: Quarries, gun tower, extra tents.
- Remote beaches: Second camp, fiber or iron, second pier.
Link forward to first ship and exploration when pier construction completes, and back to the map hub for other locations teased in full release.
Frequently Asked Questions
Quick answers to the most common questions.
Why is the island shaped like a skull?
Skull Rock is the demo's signature landmark — a pirate-themed vertical playground with cliffs, waterfalls, and visible shipwrecks in surrounding waters.
Where should I build my first pier?
The tutorial highlights valid shallow anchors below Plunderer's Pier. Connect paths to camp before construction so drifters can deliver planks.
Can I put gun towers anywhere on the island?
Towers need valid snap points with line of sight toward sea approaches. Upper skull ridges cover pier chokepoints better than interior valleys.